Tutorial 1: Generating a training set of structures
In this tutorial, you will learn how to create a set of structures with the purpose of training a cluster exapnsion (CE) model.
We start by creating a ParentLattice object, which will be used throughout the CE construction. Examples of parent lattice creation for 3D (bulk) and 2D (surface) cases are given. The 2D example shows the multicomposition-multilattice capabilities of CELL.
Next, you will learn to perform the generation of random structures out of Supercell instances. These random Structures are added to a StructuresSet object of CELL.
Such objects are extremely useful, since they allow grouping together structures for different purposes, e.g. training, testing, selection, etc. CELL’s structures sets also admit a representation in terms of ASEs structure database objects, thus inheriting all the advantages in terms of visualization, storing and retrieving structures and data in a convenient way. Excercises are proposed at the end of the tutorial.
Building parent lattices
Here you will learn how to set up and visualize a ParentLattice, which is the most basic object in CELL.
We will consider two examples: a bulk fcc crystal, and a surface system with adsorbed atoms and surface alloying.
We start with the example of a bulk binary fcc metal alloy:
[ ]:
from ase.build import bulk
from clusterx.parent_lattice import ParentLattice

pri1 = bulk('Cu', 'fcc')
sub1 = bulk('Al', 'fcc')

platt1 = ParentLattice(pri1, substitutions=[sub1])
In the first line of the code shown above, we import the bulk module of the Atomic Simulation Environment (ASE).
In the second line, the ParentLattice class of CELL is loaded.
In the next two lines, using the imported bulk function, we define Atoms objects corresponding to the pristine non-substituted Cu (fcc) lattice (pri1) and the fully substituted Al (fcc) lattice (sub1). These two Atoms objects are then employed to initialize the ParentLattice object (which we call platt1) in the last line.
Next, we would like to visualize the just created parent lattice. To this end, we use the juview function of the visualization module of CELL:
[ ]:
from clusterx.visualization import juview

juview(platt1)
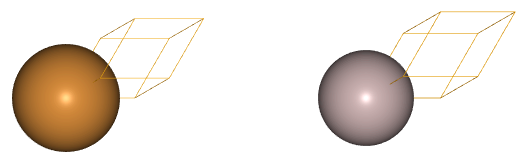
The figure on the left, corresponds to the pristine non-substituted Cu fcc crystal, while the figure on the right represents the fully Al-substituted crystal. In general, the function call juview(parent_lattice), will generate as many additional figures as substituent species are present in the parent lattice, as you will see in the next example for a surface system.
Now, we will set up the parent lattice for a surface system. It consists of an fcc(111) Al surface, with possible Na substitution on the uppermost Al layer and adsorption of oxygen atoms in “on-top” configuration. This is a fictitious system which is shown here with the only purpose to illustrate possible uses of CELL.
In order to build the parent lattice for such a system, we start with the creation of an Atoms object representing the pristine structure:
[ ]:
from ase.build import fcc111, add_adsorbate

pri2 = fcc111('Al', size=(1,1,3)) # 3-atomic-layer Al slab
add_adsorbate(pri2,'X',1.7,'ontop') # on-top vacancy ('X') site, 1.7 Angstroms above the surface.
pri2.center(vacuum=10.0, axis=2) # add vacuum along z-axis
In the code shown above, we first load some builder utilities from ASE (fcc111 and add_adsorbate).
In the next three lines, we
create a fcc(111) Al slab with three atomic layers;
add a vacancy (symbol
X) site with “on top” configuration, andadd vacuum on the sides of the slab along the \(z\)-direction.
In this way we have defined the pristine structure pri2.
Now we would like to set up the substitutions:
Na on the top-most Al layer, and
oxygen on the “on-top” vacancy sites.
To proceed, we first grab some needed information from the pristine structure, as shown below:
[ ]:
symbols = pri2.get_chemical_symbols() # Get Chemical symbols of slab
z_coords = pri2.get_positions()[:,2] # Get z-coordinate of atomic positions in slab

print(f'{"Atom index":<19s}|{"Chemical symbol":<19s}|{"z coordinate":<19s}') # Print headers
for i, (symbol, z_coord) in enumerate(zip(symbols,z_coords)):
    print(f'{i:<19d}|{symbol:<19s}|{z_coord:<19.3f}') # Print atom indexes, symbols and z_coordinates
From this output, we see that
the “Al” atom belonging to the uppermost layer (i.e. with the largest \(z\) coordinate) has atom index 2, and
the adsorbate vacant site (X) has atom index 3.
With this information, we initialize the parent lattice object in an alternative way, by telling which species can occupy every atom index: This is done with the symbols argument, which allows us to tell CELL which atomic species can occupy every atomic site:
[ ]:
platt2 = ParentLattice(pri2, symbols=[['Al'],['Al'],['Al','Na'],['X','O']])
juview(platt2)
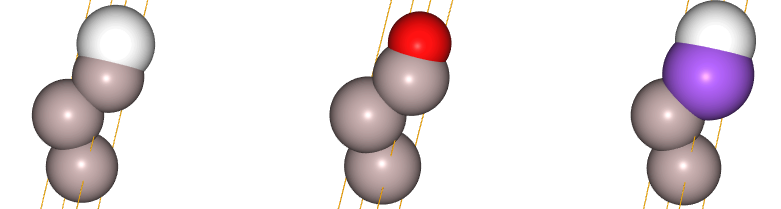
In this way, we see that for atom indices 0 and 1 only ['Al'] is allowed, while atom index 2 admits the species in the array ['Al','Na'] and atom index 3 admits species ['X','O'], where 'X' denotes a vacancy. The figures above denote: - left: pristine non-substituted lattice with vacancy-site indicated with white color - middle: on-top vacancy site substituted by oxygen (red) - right: top-most Al layer substituted by Na (purple)
Note that this pictorial representation of the parent lattice is not meant to show all possible substitutions. This will come later with the generation of structures!
This representation simply indicates the possible substitutions of the pristine structure (left), one at a time.
Building structure sets
In order to generate ab initio data to train a cluster expansion model, we need to perform calculations of the property of interest for different atomic configurations of the crystal.
These are obtained by, first, creating supercells based on the parent lattice, and second, specifying the actual placement of the different species in the supercell’s lattice, i.e. decorating the supercells.
In CELL, super cells are represented by objects of the class SuperCell. We will take the example of the surface system above, and create a \(4\times4\times1\) super cell object:
[ ]:
from clusterx.super_cell import SuperCell # load CELL's SuperCell class
import numpy as np

scell2 = SuperCell(platt2,[4,4])
juview(scell2)
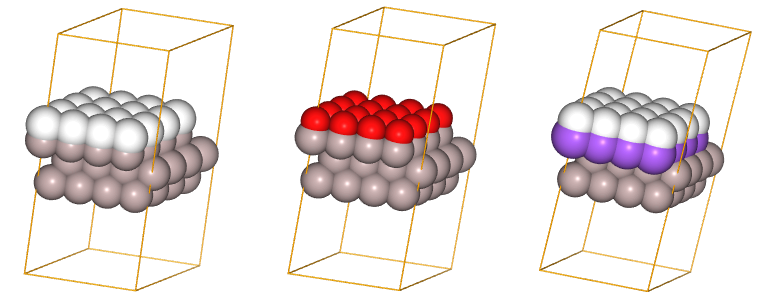
In the code shown above, we start by importing the SuperCell class. Then we create an object of this class and assign it to the variable scell2.
The initialization takes two arguments. The first one is the parent lattice previously created, platt2, and the second one can be i) an integer \(a\), ii) a 2D vector of integers \((a, b)\), iii) a 3D vector of integers \((a, b, c)\) or iv) a \(3\times 3\) matrix with integer entries. Cases i) to iii) define a diagonal transformation matrix \(P\) as, respectively
\(\begin{bmatrix}a & 0 & 0\\ 0 & a & 0\\ 0 & 0 & a\end{bmatrix}\), \(\begin{bmatrix}a & 0 & 0\\ 0 & b & 0\\ 0 & 0 & 1\end{bmatrix}\), \(\begin{bmatrix}a & 0 & 0\\ 0 & b & 0\\ 0 & 0 & c\end{bmatrix}\)
while case iv) defines a general \(3\times 3\) integer matrix.
This matrix relates the supercell lattice vectors \(S\) with the parent lattice vectors \(V\):
the rows of the matrices \(S\) and \(V\) are the cartesian coordinates of the corresponding lattice vectors, for the precise use of different input options visit the documentation).
Finally, we visualize the super cell by calling the juview function. The interpretation of the generated figure is the same as explained above for the parent lattice.
As you can see, a super cell looks very much like an enlarged parent lattice, indeed, objects of the SuperCell class inherit from the ParentLattice class and share many properties.
Now, using the created super cell, we will generate a few random decorations of it at different concentrations. The generated structures will be collected in a StructuresSet object.
Before doing so, however, we need to find out the sublattice definitions in the created SuperCell object. This is necesary to correctly address the concentrations of Na substituents and oxygen atoms in the generation of random structures. This information is retrieved with the method print_sublattice_types:
[ ]:
scell2.print_sublattice_types()
This tells us that the supercell consists of three sublattices, with indices \(0\), \(1\) and \(2\). Lattice sites belonging to sublattice \(0\), contain species "X" (vacancy) and can be substituted by species "O" (oxygen) , sites belonging to sublattice \(1\) contain "Al" and can be substituted by "Na"; while sites in \(2\) contain "Al" and can not be substituted.
In the code shown below, we first load the StructuresSet class and then create a structures-set object that we call sset2. Next, in three different for loops, by using the gen_random() method, we create i) two random structures with 4 on-top oxygen atoms, ii) two random structures with 4 Al\(\rightarrow\)Na substitutions, and iii) two
random structures with 4 oxygen atoms and 4 Al\(\rightarrow\)Na substitutions:
[ ]:
from clusterx.structures_set import StructuresSet

# seed random generators for reproducibility
import random
np.random.seed(0)
random.seed(0)
############################################

sset2 = StructuresSet(platt2)

nstruc = 2

# i) Random structures with 4 on-top oxygen atoms
for i in range(nstruc):
    sset2.add_structure(scell2.gen_random({0:[4]}))

# ii) Random structures with 4 substituent Na atoms
for i in range(nstruc):
    sset2.add_structure(scell2.gen_random({1:[4]}))

# iii) Random structures with 4 on-top oxygen and 4 substituent Na atoms
for i in range(nstruc):
    sset2.add_structure(scell2.gen_random({0:[4],1:[4]}))

juview(sset2)
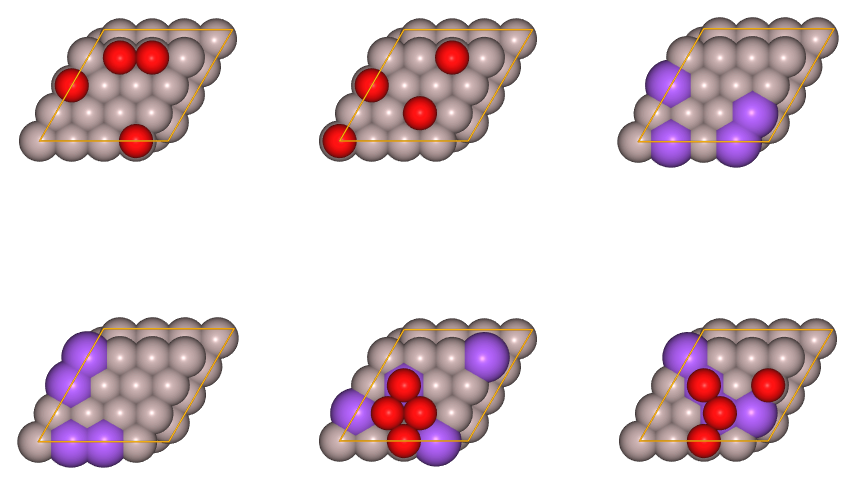
In the figure shown above, red spheres represent oxygen atoms and purple spheres represent Na substitutions.
Excercise 1
Build a parent lattice for a two-dimensional square lattice of a binary (e.g. SiGe) material and create (and visualize) 6 random structures on a \(5\times5\) super cell.
As help, you can use the following Atoms object to initialze the ParentLattice object:
[ ]:
from ase import Atoms

a=3.0
pri4 = Atoms(positions=[[0,0,0]],symbols=['Si'],cell=[[a,0,0],[0,a,0],[0,0,2*a]],pbc=(1,1,0))
Excercise 2
Generate and visualize a few random structures for the fcc CuAl alloy of the first example on this tutorial. Do it so in a \(3\times3\times3\) super cell.
[ ]: